Monday 7 June 2021

Debugging in Dynamics 365 Business Central Production Cloud Environment

 Hello Everyone,

In this article, we would discuss Debugging in Dynamics 365 Business Central Production Cloud Environment.

Normal debugging is not allowed in a Dynamics 365 Business Central Production Environment as,

a) Cannot accept halting execution/stopping session on shared NST

b) Performance impact

c) Too powerful endpoint (e.g., deploy)

d) Common limitation for SaaS services

Snapshot debugging allows a delegated admin to record AL code that runs on the server, and once it has run, debug the recorded snapshot in Visual Studio Code.

For a delegated admin to create and download a snapshot file that exists on the server on behalf of an end-user, the delegated admin must be part of the D365 Snapshot Debug permission group.

1 - User Permissions


To enable snapshot debugging it is very important that the symbols on the tenant match the symbols on the server.

There are two template configurations for a snapshot, which are accessed by selecting Add Configuration in Visual Studio Code.

a) AL: Initialize a snapshot debugging session locally

b) AL: Initialize a snapshot debugging session on cloud

2 - Initialize a snapshot debugging


Choose whether to run the session on a cloud service or locally. The configuration file will now contain the following information:

userId: The GUID of the user on whose behalf a snapshot debugging will be started. For on-premises, this can also be the user name in user password authentication scenarios. The user must be able to start, or have a session type opened that is specified in the breakOnNext parameter.

sessionId: A session ID for the user specified above in userId.

snapshotVerbosity: Determines how much execution context to be recorded. If SnapPoint is specified, then only methods that hit a snappoint will be recorded.

3 - Initialize Snapshot Debugging with UserId


4 - Business Central Admin Center


5 - Session ID and User ID


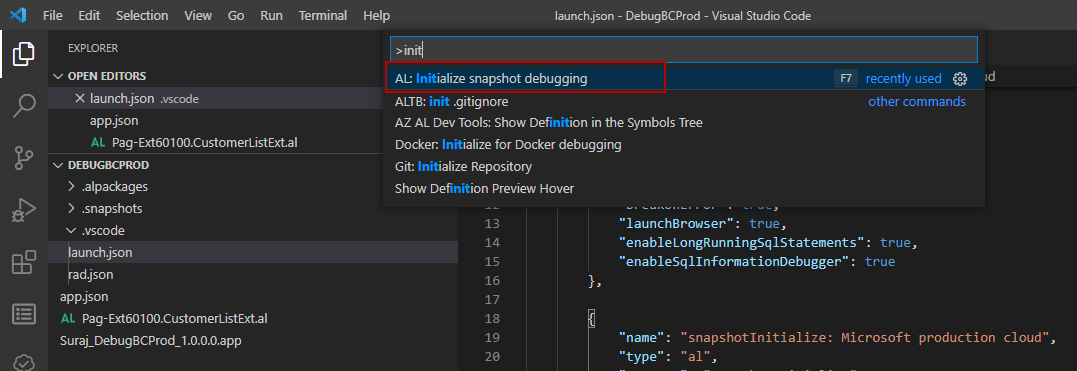
When a configuration is defined, a snapshot debugging session can be initialized by pressing Ctrl+Shift+P and then selecting AL:Initialize Snapshot Debugging or by pressing F7.

To record the AL execution, the server will now wait for a connection to happen where the following rules apply:

a) If a sessionId is specified for a userId for a given tenant then it will be that session that will be snapshot debugged.

b) If only a userId is specified for a given tenant then the next session that is specified in the breakOnNext configuration parameter is snapshot debugged.

c) If no userId is specified then the next session on a given tenant that validates the breakOnNext parameter will be snapshot debugged.

Once a snapshot debugging session is initialized the snapshot debugging session counter on the status bar will be updated and look like this:

6 - Initialize Snapshot Debugging


7 - Snapshot Debugging Initializing succeeded


Clicking on the status bar icon or pressing Shift+F7 will bring up a list of all available snapshots.

The status list will show the state of a snapshot-debugged session.

A snapshot debugging session can be in the below states:

a) Initialized - A request is issued and the server is waiting for the next session to be snapshot debugged based on the above rules.

b) Started - You have attached to an end-user session to snapshot debug.

c) Finished - When the snapshot debugging session has finished.

d) Downloaded - When the snapshot file is downloaded.

8 - Snapshot Debugging Status Initialized


9 - Sample Code for Testing


10 - Open Production Environment


11 - Snapshot Debugging Started


12 - Perform Activity in Business Central Production Environment


13 - Activity Result


You can finish a snapshot debugging session by pressing Alt+F7. This brings up all snapshot sessions that have been started. Choosing one will close the session debugging on the server and download the snapshot file.

14 - Finish Snapshot Debugging


15 - Snapshot Debugging Finished

The snapshot is downloaded as a ZIP file to the .snapshots folder in your VS Code project. And the debug icon on the status bar will be orange now.


16 - Status Downloaded

Downloaded snapshot session can be debugged offline also using Shift + F7 or click debug status icon.


17 - Select the snapshot and start the Snapshot Debugging

It is based on call stack sequence, not real time execution.

Triggers may not be stepped to in the right order in "playback".


Breakpoints can be added and removed and they will be hit if given a breakpoint; the breakpoint is in the execution context of a recorded state. This means that if walking the execution stack for a breakpoint and the next stepped line is reached, then the code will break on the breakpoint.

You can investigate code and set snappoints in symbol AL (.dal) files

Snapshot Timeout

a) Initialized session closed if not started within 30 minutes.

b) If on a frame data to be serialized grows over 100 MB, it will not be collected.

c) Captured snspahsots are removed from BC server after 8 hours (periodic scheduler)


Reference Link: https://docs.microsoft.com/en-us/dynamics365/business-central/dev-itpro/developer/devenv-snapshot-debugging

I hope this would help you a lot. Please also let me know your views.

Your valuable comments and feedback are appreciated.

Wednesday 16 September 2020

Dynamics 365 Business Central Indian Version Preview

 Hello Everyone,

You can download Business Central 17.0 Indian version preview image from Docker Container. Indian version will be available from October Release 2020 as preview, since the October 2020 release itself is in Preview state. We cannot directly create the Sandbox environment from Business Central Admin Center for IN version but the IN version preview image is available to download from docker.


Docker Container


Docker Users Group


Desktop Shortcuts


Business Central Login


Business Central Indian Version

Extended Role Center Page to display Custom Headlines.


Business Central Indian Version Extensions


I hope this would help you a lot. Please also let me know your views.

Your valuable comments and feedback are appreciated.


Friday 13 March 2020

Socket Programming in Navision and Business Central On-Premises

Hello Everyone,

In this article, we would discuss about Socket Programming.

Socket programming is a way of connecting two nodes on a network to communicate with each other. 

A Socket is an End-Point of To and From (Bidirectional) communication link between two programs (Server Program and Client Program ) running on the same network.

A Server Socket Program running on a computer has a socket that bound to a Port Number on the same computer and listening to the client's incoming requests.

A Client Socket Program have to know the IP Address (Hostname) of the computer that the C# Server Socket Program resides and the Port Number assign for listening for client's request .

Communication protocol used for Socket Programming is TCP/IP ( Transmission Control Protocol/Internet protocol).

Code:

I have created a dll for the same which takes Input as IpAddress, PortNumber and Input Message and returns Response Message.

Variable Declaration:


Navision Code:


.Net dll Code:


Code Download Link: Socket Programming


That's it !!!

I hope this would help you a lot. Please also let me know your views.

Your valuable comments and feedback are appreciated.

Wednesday 3 July 2019

Migrate Data from Business Central On Premises to Business Central On Cloud with Extensions

Hello Everyone,

In this article, we would discuss about migrating data from Business Central On Premises to Business Central On Cloud using Intelligent Cloud with Extensions.

Reference Link: https://docs.microsoft.com/en-us/dynamics365/business-central/dev-itpro/administration/about-intelligent-edge

Important Notes:

1) Before setting up the connection to the intelligent cloud, ensure that at least one user in the system that has SUPER permissions. This is the only user that will be allowed to make changes in the Business Central tenant.

2) The amount of data that can be replicated for any tenant is limited to 150 GB. If your database is larger than 150 GB, try reducing the number of companies you are replicating data for. (Current Limitation)


3) SQL Business Central On Premises Database Compatibility Level: 130

Step by Step Instructions:

1 - Business Central On Cloud - Assisted Setup


2 – Setup Intelligent Cloud


3 – Intelligent Cloud Setup


4 – Replicate Data From Business Central


5 – SQL Database Connection


Server={SQL Server Name};Database={Database Name};User Id={SQL Server Authenticated UserName};Password={SQL Server Authenticated Password};

Server=SERVER01\SQLSERVER2016;Database=Base DB BC Spring 2019 Build 29530 Cloud;User Id=sa;Password=xxxx;


6 – Self Hosted Integration Run-time

Copy the Authentication Key in Notepad as it would be used in later steps. Download and install Self Hosted Integration Run-time from link in the screenshot. Complete Steps 7, 8, 9 and 10 before clicking Next in Step 6. After clicking Next in Step 6 Go-to Step 11.


7 – Install Microsoft Integration Run-time


8 – Authentication Key - Register

Copy and Paste the Authentication key that was saved in Step 6.


9 – Integration Run-time Registered Successfully


10 – Integration Run-time Configuration Manager


11 – Replicate Companies from Business Central On Premises


12 – Schedule Replication


13 – Intelligent Cloud Setup Completed


14 – Setup Intelligent Cloud Completed


15 – Replication Initialization Completed


16 – Company CRONUS Canada, Inc. – Created Successfully – On Cloud


17 – Intelligent Cloud Management – Run Replication Now

This process would replicate data from Business Central On Premises to Business Central On Cloud.


18 – Replication Triggered Successfully


19 – Replication Results


20 – Replication Statistics


21 – Replication Status Information

Data Replicated Successfully.


22 – Extension – Business Central On Premises - Item Table

Now we have created a simple Extension extending Item Table and created a new Custom Table in On Premises Environment. We have also inserted sample data for same in On Premises Environment.


23 – Extension – Business Central On Premises – Custom - Intelligent Cloud Table


24 – Extension – Business Central – On Cloud

We have installed the same Extension created above in Business Central On Cloud Environment.


25 – Run Replication – On Cloud

Now as same Extension is installed in Business Central On Premises and Business Central On Cloud, this process would replicate data for same.


26 – Replication Completed Successfully


27 – Data – Item Table – Business Central On Cloud


28 – Data – Custom Intelligent Cloud Table – Business Central On Cloud


That's it !!!


I hope this would help you a lot. Please also let me know your views.

Your valuable comments and feedback are appreciated.